Grand Canyon Photography Guide: 7 Days of Golden Hour & Hidden Vistas
Capture the Grand Canyon's dramatic beauty with this 7-day photography guide. Discover hidden viewpoints, master golden hour shots, and find the best light.
- Duration: 7 Days
- Estimated Budget: $1,470–$2,380
- Best Time to Visit: April-May or September-October for pleasant weather and clear skies; July-September for dramatic monsoon storm light.
- Destination: Grand Canyon National Park, Arizona, USA
Ready to capture the Grand Canyon in a way few ever do? This isn't just a trip; it's a photographic expedition designed to put you in the right place at the right time, every time. From the fiery hues of sunrise to the deep purple shadows of blue hour, you'll uncover the canyon's most dramatic light and composition, far beyond the typical postcard shots.
Beyond the crowded overlooks, the Grand Canyon reveals its true photographic potential, allowing you to capture it not just seeing it, but truly capturing its soul through your lens. From Mather Point to Hopi Point, we'll chase the golden hour, revel in the deep blues of twilight, and understand that the best light transforms an already magnificent landscape into something otherworldly. We'll explore the iconic vistas and uncover hidden gems, ensuring your memory card is as full as your heart.
This itinerary is crafted for the photographer, whether you're a seasoned pro or an enthusiastic amateur, eager to master the art of canyon photography. We'll focus on specific times of day, from the 'blue hour' before dawn when the canyon fills with purple shadow, to the 'golden hour' that paints the walls in fiery reds and oranges. You'll learn to anticipate the light, compose breathtaking shots, and frame the majestic silhouette of Desert View Watchtower against the rising sun.
Forget the crowded, generic viewpoints and prepare for an immersive experience that prioritizes light, composition, and unique perspectives. We'll guide you to the lesser-known spots, provide insider tips for capturing the canyon's ever-changing moods, and even prepare you for the dramatic beauty of storm light during monsoon season. Get ready to create a portfolio of images that truly reflects the Grand Canyon's unparalleled grandeur.
South Rim Arrival & Sunset Spectacle
Arrive at Grand Canyon National Park's South Rim entrance and check into your hotel.
Settling in promptly allows you to relax and prepare for the photographic adventures ahead. You'll want to be well-rested for early mornings and late evenings.
Familiarize yourself with the Grand Canyon Visitor Center, picking up maps and checking current conditions.
This is your essential first stop for understanding the park's layout and any potential trail closures or weather warnings. It's also a good spot to grab any last-minute essentials.
Take a leisurely stroll along the Rim Trail near Grand Canyon Village, getting your first wide-angle shots of the canyon.
This initial walk helps you acclimate to the immense scale of the canyon and scout potential compositions for later. It's a gentle introduction before the main event.
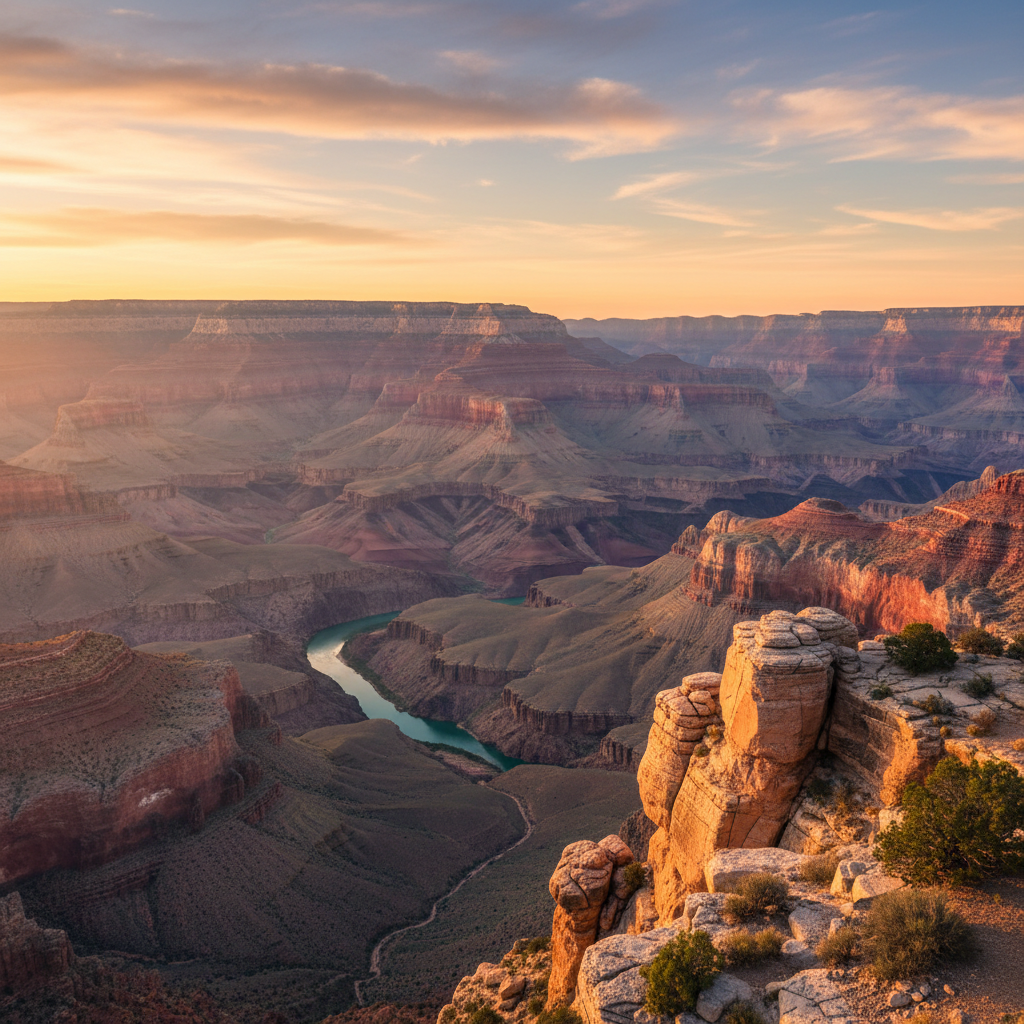
Head to Mather Point for the classic Grand Canyon sunset shot, arriving 45 minutes early to secure your spot.
Mather Point offers an iconic, expansive view of the canyon, perfect for capturing the golden hour light on the North Rim. This is the shot everyone wants.
Transition to Yavapai Point for the 'blue hour,' staying after sunset to capture the canyon in deep purple shadows.
The blue hour at Yavapai Point is magical, as the canyon fills with rich, deep purple hues, and the Colorado River often catches the last lingering light. It's a completely different mood than sunset.
Leif's Tip: Upon arrival, immediately scout your sunset and blue hour locations. The light changes quickly, and knowing exactly where you want to set up your tripod will save you precious minutes and ensure you get the perfect shot. Also, pack layers; even in summer, the canyon rim can get chilly after sunset.
Navigating the Grand Canyon for photography, especially for those elusive golden hour rim shots and inner canyon light, presents unique challenges. You're not just contending with vast distances and limited shuttle schedules, but also the sheer number of visitors vying for the same iconic spots, particularly at sunrise. Finding those less-traveled viewpoints requires local insight, knowledge of specific access roads, and understanding how the light interacts with the canyon walls at different times of day. Without a precise plan, you risk spending precious photographic moments stuck in traffic, searching for parking, or arriving at an overcrowded vista when the light has already passed its peak. Leif meticulously maps out your route, factoring in drive times, optimal lighting conditions, and even alternative, quieter locations so your focus remains entirely on capturing breathtaking images, not logistical headaches.
Mather Point, with its iconic sunrises, becomes your private studio as Leif ensures you capture the canyon's majestic awakening. Instead of scrambling for a spot alongside dozens of others, you're set up, tripod ready, with a clear view of the canyon awakening. Your itinerary details not just the viewpoint, but also the ideal lens choice for that specific moment, the direction of the rising sun, and even a recommendation for a nearby, slightly elevated rock formation for a unique perspective. Later, when the mid-day sun harshens the light, Leif directs you to shaded trails leading to inner canyon overlooks, revealing how to capture the subtle textures and hidden waterfalls that thrive away from the direct glare, ensuring every hour of your day is maximized for photographic potential.
The crisp, cool air of a Grand Canyon morning, carrying the scent of ponderosa pine and damp earth, feels different when you know exactly where you're headed. There’s a profound sense of calm and anticipation as you approach a viewpoint, confident that the light will be perfect, the composition ready for your lens. You’ll experience the canyon’s majesty not as a hurried tourist, but as an artist, fully immersed in its ever-changing beauty, knowing you’re capturing moments most people only dream of. This preparation liberates you to truly see, to feel, and to create, leaving you with a portfolio of images that tell a story far richer than any snapshot, and a desire to return to this magnificent landscape again and again.
Best Time to Visit Grand Canyon National Park, Arizona, USA
Spring (April-May) and Fall (September-October) offer pleasant temperatures, fewer crowds, and stunning light for photography.
Monsoon season (July-September) brings dramatic storm clouds and the potential for incredible lightning shots over the canyon, though be prepared for rain and humidity.
For the North Rim, aim for late spring or early fall as it's at a higher elevation and opens later/closes earlier than the South Rim.
Avoid mid-day photography in summer; the light is harsh and flattens the canyon's features. Focus on golden and blue hours.
Getting Around Grand Canyon National Park, Arizona, USA
Book your rental car well in advance, especially if visiting during peak season. An SUV with good clearance is beneficial for exploring off-the-beaten-path viewpoints.
Utilize the free shuttle buses on the South Rim's Hermit Road (March-November) to access key viewpoints without parking hassles. They run frequently.
For the North Rim day trip, factor in the 4.5-hour drive each way from the South Rim. Start early to maximize your time there.
Consider a helicopter tour for an aerial perspective of the canyon, offering unique photographic opportunities you can't get from the rim.
What to Pack
- Sturdy hiking boots with good ankle support for trail descents and uneven terrain.
- A wide-angle lens (16-35mm) for grand landscapes and a telephoto lens (70-200mm or longer) for compressing distant features and wildlife.
- A tripod and remote shutter release are essential for sharp golden hour, blue hour, and low-light photography.
- Plenty of water and snacks, especially when hiking or exploring remote areas where services are limited.
- Layers of clothing: mornings and evenings can be chilly, even in summer, while midday can be hot.
- Headlamp or flashlight for pre-dawn starts and post-sunset shoots.
- Extra camera batteries and memory cards; you'll be shooting a lot!
- Sun protection: wide-brimmed hat, sunglasses, and high-SPF sunscreen.
Money-Saving Tips
- Purchase an America the Beautiful Pass if you plan to visit multiple national parks within a year; it's more cost-effective than individual entrance fees.
- Pack your own food and drinks for day trips and hikes. Restaurant options within the park can be pricey.
- Consider staying in Tusayan, just outside the South Rim entrance, for slightly more affordable lodging options if El Tovar is out of budget or booked.
- Book accommodations and rental cars as far in advance as possible to secure better rates, especially for popular hotels like El Tovar.
Local Insights
- Always stay on marked trails and behind safety barriers. The canyon is vast and unforgiving, and accidents happen when people venture too close to the edge for a shot.
- Respect the Havasupai Tribe and their land if you are fortunate enough to visit Havasu Falls. Permits are extremely difficult to obtain and require careful planning.
- Be aware of wildlife. Deer, elk, and condors are common. Maintain a safe distance and never feed animals.
- The weather in the Grand Canyon can change rapidly. Be prepared for sudden temperature drops, wind, and even snow, especially at higher elevations or during shoulder seasons.
Frequently Asked Questions
What camera gear is essential for this trip?
Beyond your camera body, a wide-angle lens (16-35mm equivalent) is crucial for sweeping landscapes. A telephoto lens (70-200mm or longer) is excellent for compressing distant features and capturing details. Don't forget a sturdy tripod for low-light shots, extra batteries, and plenty of memory cards. A remote shutter release can also be very helpful.
How do I best prepare for early morning and late evening shoots?
Layered clothing is key, as temperatures can fluctuate dramatically between day and night, even in summer. Headlamps or flashlights are essential for navigating in the dark. Pack snacks and water, as services might not be open during these hours. Always check sunrise/sunset times and arrive at your chosen viewpoint at least 45-60 minutes early to scout your composition.
Is the North Rim worth the long drive for photography?
Absolutely. The North Rim offers a completely different perspective, being 1,000 feet higher and much more forested, with significantly fewer crowds. The light interacts with the canyon walls differently, and viewpoints like Point Imperial and Cape Royal provide unique compositions, including the iconic Angel's Window arch. It's a must for diverse canyon photography.
What are the best times of year to visit for photography?
Spring (April-May) and Fall (September-October) offer pleasant temperatures and beautiful light, with fewer crowds than summer. Monsoon season (July-September) can be incredible for dramatic storm clouds and lightning over the canyon, though you'll need to be prepared for rain. Winter (November-March) offers stunning snow-dusted landscapes, but some roads and services may be closed.
How can I capture the scale of the Grand Canyon in my photos?
Incorporating a human element (a person standing on the rim) or a recognizable object (like a tree or watchtower) in your foreground can effectively convey the immense scale. Using a wide-angle lens and shooting from a higher vantage point also helps to emphasize the vastness and depth of the canyon.
What are some lesser-known viewpoints for unique shots?
Beyond the popular spots, Shoshone Point (requiring a short walk off-trail) offers unparalleled privacy and stunning golden hour light on the South Rim. On Desert View Drive, Lipan Point provides excellent Colorado River views, often with fewer people than Mather Point. For the North Rim, Point Imperial is often overlooked but offers the highest viewpoint and unique perspectives.
What are the essential camera settings for Grand Canyon photography?
For sunrise/sunset, a good starting point is f/11, ISO 100, 1/60s, adjusting as needed. For blue hour, try f/8, ISO 400, 1/15s, using a tripod. For inner canyon shots in daylight, f/8, ISO 200, 1/125s should work well. Always shoot in RAW for maximum editing flexibility, and use a histogram to ensure proper exposure.